
一、@Resource和@Autowired的区别
1、@Autowired与@Resource都可以用来装配bean. 都可以写在字段上,或写在setter方法上。
2、@Autowired默认按类型装配(这个注解是属于spring的) 默认情况下必须要求依赖对象必须存在,如果要允许null值,可以设置它的required属性为false,如: @Autowired(required=false) ,如果我们想使用名称装配可以结合@Qualifier注解进行使用,如下:
@Autowired() @Qualifier("baseDao")
private BaseDao baseDao;
3、@Resource 是JDK1.6支持的注解,默认按照名称进行装配
@Resource装配顺序
- 如果同时指定了name和type,则从Spring上下文中找到唯一匹配的bean进行装配,找不到则抛出异常
- 如果指定了name,则从上下文中查找名称(id)匹配的bean进行装配,找不到则抛出异常
- 如果指定了type,则从上下文中找到类型匹配的唯一bean进行装配,找不到或者找到多个,都会抛出异常
- 如果既没有指定name,又没有指定type,则自动按照byName方式进行装配;如果没有匹配,则回退为一个原始类型进行匹配,如果匹配则自动装配 但是需要注意的是,如果name属性一旦指定,就只会按照名称进行装配。
只不过注解处理器我们使用的是Spring提供的,是一样的,无所谓解耦不解耦的说法,两个在便利程度上是等同的。
@Resource(name="baseDao")
private BaseDao baseDao;
byName 通过参数名 自动装配,如果一个bean的name 和另外一个bean的 property 相同,就自动装配。 byType 通过参数的数据类型自动自动装配,如果一个bean的数据类型和另外一个bean的property属性的数据类型兼容,就自动装配
我们可以通过 @Autowired / @Resource 在 Bean 类中使用自动注入功能,但是 Bean 还是在 XML 文件中通过
public class Boss {
    private Car car;
    private Office office;
   @Override
    public String toString() {
        return "car:" + car + "\n" + "office:" + office;
    }
}
<?xml version="1.0" encoding="UTF-8" ?>
<beans xmlns="http://www.springframework.org/schema/beans"
    xmlns:xsi="http://www.w3.org/2001/XMLSchema-instance"
     xmlns:context="http://www.springframework.org/schema/context"
     xsi:schemaLocation="http://www.springframework.org/schema/beans
 http://www.springframework.org/schema/beans/spring-beans-2.5.xsd
 http://www.springframework.org/schema/context
 http://www.springframework.org/schema/context/spring-context-2.5.xsd">

    <context:annotation-config/>

    <bean id="boss" class="com.sss.Boss"/>
    <bean id="office" class="com.sss.Office">
        <property name="officeNo" value="001"/>
    </bean>
    <bean id="car" class="com.sss.Car" scope="singleton">
        <property name="brand" value=" 红旗 CA72"/>
        <property name="price" value="2000"/>
    </bean>
</beans>
spring2.5提供了基于注解(Annotation-based)的配置,我们可以通过注解的方式来完成注入依赖。在Java代码中可以使用 @Resource或者@Autowired注解方式来进行注入。虽然@Resource和@Autowired都可以来完成注入依赖,但它们之间是有区别:
a. @Autowired默认是按照类型装配注入的,如果想按照名称来转配注入,则需要结合@Qualifier一起使用 b.@Resource默认是按照名称来装配注入的,只有当找不到与名称匹配的bean才会按照类型来装配注入 c. @Resource注解是由JDK(1.6以上版本)提供,而@Autowired是由Spring提供@Resource的方式 d. @Resource和@Autowired都可以书写标注在字段或者该字段的setter方法之上
2、使用注解的方式,我们需要修改spring配置文件的头信息
<?xml version="1.0" encoding="UTF-8"?><beans http://www.springframework.org/schema/beans"xmlns:xsi="http://www.w3.org/2001/XMLSchema-instance"xmlns:context="Index of /schema/context"
       xsi:schemaLocation="Index of /schema/beans
http://www.springframework.org/schema/beans/spring-beans-2.5.xsd
Index of /schema/context
http://www.springframework.org/schema/context/spring-context-2.5.xsd">
    <context:annotation-config/></beans>
在基于注解方式配置Spring的配置文件中,你可能会见到
<context:annotation-config/>
这样一条配置,他的作用是式地向 Spring 容器注册
AutowiredAnnotationBeanPostProcessor
CommonAnnotationBeanPostProcessor
PersistenceAnnotationBeanPostProcessor
RequiredAnnotationBeanPostProcessor
这 4 个BeanPostProcessor。
注册这4个BeanPostProcessor的作用,就是为了你的系统能够识别相应的注解。
例如:
如果你想使用@Autowired注解,那么就必须事先在 Spring 容器中声明 AutowiredAnnotationBeanPostProcessor Bean。传统声明方式如下
<bean class="org.springframework.beans.factory.annotation. AutowiredAnnotationBeanPostProcessor "/>
如果想使用@ Resource 、@ PostConstruct、@ PreDestroy等注解就必须声明CommonAnnotationBeanPostProcessor
<bean class="org.springframework.beans.factory.annotation. CommonAnnotationBeanPostProcessor"/>
如果想使用@PersistenceContext注解,就必须声明PersistenceAnnotationBeanPostProcessor的Bean。
<bean class="org.springframework.beans.factory.annotation.PersistenceAnnotationBeanPostProcessor"/>
如果想使用 @Required的注解,就必须声明RequiredAnnotationBeanPostProcessor的Bean。
同样,传统的声明方式如下:
<bean class="org.springframework.beans.factory.annotation.RequiredAnnotationBeanPostProcessor"/>
一般来说,这些注解我们还是比较常用,尤其是Antowired,在自动注入的时候更是经常使用,所以如果总是需要按照传统的方式一条一条配置显得有些繁琐和没有必要,于是spring给我们提供context:annotation-config/的简化配置方式,自动帮你完成声明。
不过,我们使用注解一般都会配置扫描包路径选项
<context:component-scan base-package=”XX.XX”/>
该配置项其实也包含了自动注入上述processor的功能,因此当使用 context:component-scan/ 后,就可以将 context:annotation-config/ 移除
比如:
<context:component-scan base-package="carPoolingController, carPoolingService, carPoolingDao" />
就把controller包下 service包下 dao包下的注解全部扫描了
3、修改以上配置文件的头信息后,我们就可以在Java代码通过注解方式来注入bean,看下面代码
(1)@Resource
public class StudentService3 implements IStudentService {
    //@Resource(name="studentDao")放在此处也是可行的
    private IStudentDao studentDao;
    private String id;
    public void setId(String id) {
        this.id = id;
    }
@Resource(name=“studentDao”) // 通过此注解完成从spring配置文件中查找名称为studentDao的bean来装配字段studentDao,如果spring配置文件中不存在 studentDao名称的bean则转向按照bean类型进行查找
public void setStudentDao(IStudentDao studentDao) {
    this.studentDao = studentDao;
}
public void saveStudent() {
        studentDao.saveStudent();
        System.out.print(",ID 为:"+id);
}
配置文件添加如下信息
<bean id="studentDao" class="com.sss.dao.impl.StudentDao"></bean>
<bean id="studentService3" class="com.sss.service.impl.StudentService3"></bean>
(2)@Autowired
public class StudentService3 implements IStudentService {
  	//@Autowired放在此处也是可行的
 	private IStudentDao studentDao;
    private String id;
    public void setId(String id) {
        this.id = id;
}
@Autowired
//通过此注解完成从spring配置文件中 查找满足studentDao类型的bean //@Qualifier(“studentDao”)则按照名称进行来查找转配的
public void setStudentDao(IStudentDao studentDao) {
     this.studentDao = studentDao;
}
public void saveStudent() {
       studentDao.saveStudent();
       System.out.print(",ID 为:"+id);
}
配置文件添加如下信息
<bean id="studentDao" class="com.wch.dao.impl.StudentDao"></bean>
<bean id="studentService3" class="com.wch.service.impl.StudentService3" />
当我们在xml里面为类配置注入对象时,会发现xml文件会越来越臃肿,维护起来很麻烦。这时候我们可以使用注解这种机制来为类配置注入对象。
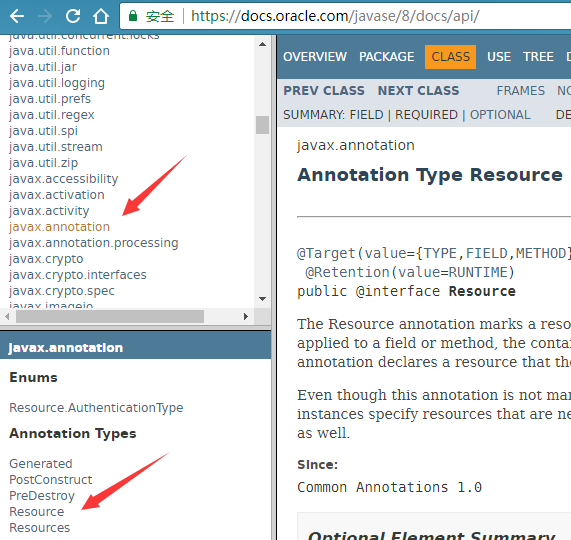
原生java为我们提供了 javax.annotation.Resource这个注解。
spring框架提供了org.springframework.beans.factory.annotation.Autowired。
一般情况下我们使用 javax.annotation.Resource这个注解,因为这样我们就能实现和spring框架的解藕(难以认同,因为注解处理器还是Spring提供的)。
@Resource可以作用于字段和函数上。当作用于字段上的时候,如果我们只是简单的这样写
@Resource PersonDao p;
这时候spring注入p的过程是 1、查找xml中是否有id为p的元素 2、如果没有找到,则看是否有name属性(@Resource name=“”),有则查找name 3、否则查找PersonDao类型的元素
@Resource可作用于set函数上。 例如:
@Resource public void setP(PersonDao p) {
    this.p = p;
}
@Autowired注解是根据类型进行查找,比如PersonDao p,它会去xml文件里查找类型为PersonDao的元素
二、@Repository @Component @Service @Controller之间的区别与联系
引用spring的官方文档中的一段描述:
在Spring2.0之前的版本中,@Repository注解可以标记在任何的类上,用来表明该类是用来执行与数据库相关的操作(即dao对象),并支持自动处理数据库操作产生的异常
在Spring2.5版本中,引入了更多的Spring类注解:@Component,@Service,@Controller。@Component是一个通用的Spring容器管理的单例bean组件。而@Repository, @Service, @Controller就是针对不同的使用场景所采取的特定功能化的注解组件。
因此,当你的一个类被@Component所注解,那么就意味着同样可以用@Repository, @Service, @Controller来替代它,同时这些注解会具备有更多的功能,而且功能各异。
最后,如果你不知道要在项目的业务层采用@Service还是@Component注解。那么,@Service是一个更好的选择。
就如上文所说的,@Repository早已被支持了在你的持久层作为一个标记可以去自动处理数据库操作产生的异常(译者注:因为原生的java操作数据库所产生的异常只定义了几种,但是产生数据库异常的原因却有很多种,这样对于数据库操作的报错排查造成了一定的影响;而Spring拓展了原生的持久层异常,针对不同的产生原因有了更多的异常进行描述。所以,在注解了@Repository的类上如果数据库操作中抛出了异常,就能对其进行处理,转而抛出的是翻译后的spring专属数据库异常,方便我们对异常进行排查处理)。
| 注解 | 含义 |
|---|---|
| @Component | 最普通的组件,可以被注入到spring容器进行管理 |
| @Repository | 作用于持久层 |
| @Service | 作用于业务逻辑层 |
| @Controller | 作用于表现层(spring-mvc的注解) |
其他网上资料
这几个注解几乎可以说是一样的:因为被这些注解修饰的类就会被Spring扫描到并注入到Spring的bean容器中。
这里,有两个注解是不能被其他注解所互换的:
@Controller 注解的bean会被spring-mvc框架所使用
@Repository 会被作为持久层操作(数据库)的bean来使用
如果想使用自定义的组件注解,那么只要在你定义的新注解中加上@Component即可:
@Component
@Scope("prototype")
public @interface ScheduleJob{...}
这样,所有被@ScheduleJob注解的类就都可以注入到spring容器来进行管理。我们所需要做的,就是写一些新的代码来处理这个自定义注解(译者注:可以用反射的方法),进而执行我们想要执行的工作。
@Component就是跟<bean>一样,可以托管到Spring容器进行管理。
@Service, @Controller , @Repository = {@Component + 一些特定的功能}。这个就意味着这些注解在部分功能上是一样的。
当然,下面三个注解被用于为我们的应用进行分层:
@Controller注解类进行前端请求的处理,转发,重定向。包括调用Service层的方法
@Service注解类处理业务逻辑
@Repository注解类作为DAO对象(数据访问对象,Data Access Objects),这些类可以直接对数据库进行操作
有这些分层操作的话,代码之间就实现了松耦合,代码之间的调用也清晰明朗,便于项目的管理;假想一下,如果只用@Controller注解,那么所有的请求转发,业务处理,数据库操作代码都糅合在一个地方,那这样的代码该有多难拓展和维护。
总结
@Component, @Service, @Controller, @Repository是spring注解,注解后可以被spring框架所扫描并注入到spring容器来进行管理
@Component是通用注解,其他三个注解是这个注解的拓展,并且具有了特定的功能
@Repository注解在持久层中,具有将数据库操作抛出的原生异常翻译转化为spring的持久层异常的功能。
@Controller层是spring-mvc的注解,具有将请求进行转发,重定向的功能。
@Service层是业务逻辑层注解,这个注解只是标注该类处于业务逻辑层。
用这些注解对应用进行分层之后,就能将请求处理,业务逻辑处理,数据库操作处理分离出来,为代码解耦,也方便了以后项目的维护和开发。
三、@PostConstruct 和 @PreDestroy
被@PostConstruct修饰的方法会在服务器加载Servlet的时候运行,并且只会被服务器执行一次。
@PostConstruct修饰的方法在构造函数之后执行,init()方法之前执行。
@PreDestroy修饰的方法在destroy()方法执行之后执行

一般在项目中@PostConstruct主要应用场景是在初始化Servlet时加载一些缓存数据等。但是使用此注解时会影响到服务的启动时间。
四、@RestController和@Controller的区别
@RestController的产生,从Spring 4.0以后产生的,用来将json/xml数据发送到前台页面,而不是返回视图页面。
@RestController和@Controller的区别
@RestController加在类上面的注解,使得类里面的每个方法都将json/xml返回数据加返回到前台页面中。
@RestController
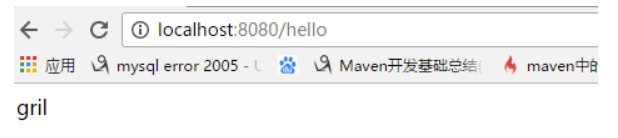
public class HelloController {
@GetMapping(value="/hello")
public String say(){
return "gril";
}
}
@Controller加在类上面的注解,使得类里面的每个方法都返回一个视图页面。
@Controller
public class HelloController {
	@GetMapping(value="/hello")
	public String say(){
   	 return "gril";
	}
}
@Controller和@ResponseBody(加在方法/类上面)一起使用,和@RestController的作用相同。
@Controller
public class HelloController {
@GetMapping(value="/hello")
@ResponseBody
public String say(){//返回json 数据
return "gril";
}
@GetMapping(value="/hello1")
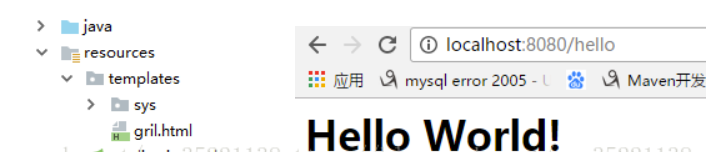
public String say1(){//返回视图
return "sys/index1";
}
}
@Controller
@ResponseBody
public class HelloController {
   // 都返回json数据到页面
    @GetMapping(value="/hello")
    public String say(){
        return "gril";
    }
    @GetMapping(value="/hello1")
    public String say1(){
        return "sys/index1";
    }
}
五、@Component和@Bean的区别
Spring帮助我们管理Bean分为两个部分,一个是注册Bean,一个装配Bean。 完成这两个动作有三种方式,一种是使用自动配置的方式、一种是使用JavaConfig的方式,一种就是使用XML配置的方式。
@Compent 作用就相当于 XML配置
@Component
public class Student {

	private String name = "lkm";

	public String getName() {
    	return name;
	}

	public void setName(String name) {
    	this.name = name;
	}
}
@Bean 需要在配置类中使用,即类上需要加上@Configuration注解
@Configuration
public class WebSocketConfig {
    @Bean
    public Student student(){
        return new Student();
    }

}
两者都可以通过@Autowired装配
@Autowired
Student student;
那为什么有了@Compent,还需要@Bean呢? 如果你想要将第三方库中的组件装配到你的应用中,在这种情况下,是没有办法在它的类上添加@Component注解的,因此就不能使用自动化装配的方案了,但是我们可以使用@Bean,当然也可以使用XML配置。
区别:
@Component(@Controller、@Service、@Repository)通常是通过类路径扫描来自动侦测以及自动装配到Spring容器中。
而@Bean注解通常是我们在标有该注解的方法中定义产生这个bean的逻辑。
@Component 作用于类,@Bean作用于方法。